Showing posts with label Dynamics CRM. Show all posts

Get along in Dynamics 365

Efficient data entry

Dynamics 365 encourages users to manage their data concurrently. Users can view and update records even while their colleagues are modifying the very same records. This is in contrast to the old days of Excel sheets being locked when in use by another user. But what happens when two users access the same record and update it at the same time?

The challenges of concurrency

Since CRM 2015 Update 1, Dynamics 365 has supported optimistic concurrency, which is detailed in this blog post.

"The idea is simple, the entities now have a property called RowVersion (auto incremental number) which stores the retrieved version of the record. When an Update or Delete request is executed (and the ConcurrencyBehavior has been explicitly configured), Dynamics 365 will compare if the record RowVersion is the same than the one stored in the database and rollback the operation if they're not."

However, this feature is only available through the SDK, and can't be added with basic form customisations. Some developers have found an internal function to access the RowVersion property, but because the function isn't documented by Microsoft, it isn't supported.

So to answer the initial question: when two users update the same record at the same time, the resulting record in the database is a combination of both records. However, if both users updated the same field, then the database will store the value entered last. The user who hit save a few seconds before would therefore lose their data.

Overcoming the challenges

With reference to this post I've offered two potential solutions, though these require either C# code or unsupported JavaScript.

I'd like to offer an alternative approach which is lightweight, configurable, supported and requires no code to setup.

Introducing get-along.js.

Get Along is a small, documented tool which can be installed in any Dynamics 365 environment and configured to notify users when a record they're viewing is modified by someone else. For developers, the installation is as simple as:

  1. Downloading Get Along from its GitHub page.
  2. Adding a single script file to the relevant form (i.e. Contact or Account).
  3. Registering an onLoad event handler.

At the time of writing, the project is new and only supports an information-style notification banner to users. The project has a backlog of new features on the way, including:

  • Configurable alert dialog boxes with buttons as a choice rather than notification banners.
  • Configurable notification text displayed to users.
  • Hopefully more added by contributors (the project is open source).

Wrapping up

Being notified of changes elsewhere isn't always desired behaviour. Users might want to be left alone to manage their data, and could be well aware that other users are tinkering with the same records.

However, sometimes data loss on forms is a problem for businesses.

  • A process within the business might dictate that only one user should be updating a record at one time.
  • Form logic might execute on update of certain fields, that all users should be made aware of. Because form logic is client-side, users will not see this change unless they're notified to refresh the record.
  • Users may be used to notification behaviour if they use other collaboration tools such as Microsoft Excel Online or Confluence.

There are solutions available such as introducing optimistic concurrency which, as we've explored, can either be complex or require unsupported code.

Get Along offers a lightweight, configurable and supported solution to data loss. The project is open source and has a backlog of new features in the pipeline which will grow to support further configuration.

Unit test Web API calls with xrm-mock and SinonJS

Setting the scene

We write JavaScript to perform business logic client-side on Dynamics forms.

  • Sometimes we want to dynamically alter the layout of a form (collapse tabs, hide sections etc.)
  • Sometimes we want to update field values
  • And sometimes we want to retrieve data from Dynamics using the Web API and then act on it

No matter why we're writing client-side scripts, we always want to write tests for them.

I've previously written in this blog post and others how basic Xrm functions can be tested against using xrm-mock. However, what about more advanced Xrm functions such as Xrm.WebApi?

Introducing the Web API with v9

Xrm.WebApi was introduced with Dynamics 365 version 9. In Microsoft's words, it: "Provides properties and methods to use Web API to create and manage records and execute Web API actions and functions in Customer Engagement".

My interpretation would be that it enables developers to interact with the Web API using shorthand code. For example, prior to version 9, one would write the following to create an account:

Now, using Xrm.WebApi this can be rewritten as:

Faking Web API calls using xrm-mock

XrmMockGenerator.initialise() initialises an empty Xrm.WebAPI object. Calls to its methods such as createRecord throw a not implemented error. The current recommended approach is to therefore stub any API methods being called in the code under test, and force their return values. This allows you to:

  • control your test's expected behaviour
  • prevent direct calls to the Dynamics database via XMLHttpRequest or similar

Here's an example

This example demonstrates a basic client-side script running on a Contact form in Dynamics. When the form is loaded, the script:

  • gets the Id of the Contact's Parent Contact via Xrm.Page.getAttribute.getValue
  • retrieves the Parent Contact's name via Xrm.WebApi.retrieveRecord
  • sets the Contact's description to "My parent is called {parent contact's name}" via Xrm.Page.getAttribute.setValue

This example uses Sinon.JS to help create Web Api stubs.

"Standalone and test framework agnostic JavaScript test spies, stubs and mocks (pronounced "sigh-non", named after Sinon, the warrior)."

First, here's contact.ts, the script which will be run on the Contact form:

And here's contact.test.ts, the script we'll use to test contact.ts:

Walkthrough: Understand the Code

Testing in action with Wallaby.js

And that's it

Using the example above you can see how to:

  • Create a fake Xrm object to use in client-side unit tests by using xrm-mock.
  • Stub a call to Xrm.WebApi to control your test's behaviour and not directly call the Dynamics database.
  • Write asynchronous TypeScript code for Dynamics.

This example and all its source code is available on xrm-mock's GitHub page here.

Retrieve Status Reason Metadata with the Web API

Quick one! Have you ever tried, or are you currently trying to get statuscode metadata programatically from your Dynamics organisation? e.g. the Status Reason on your Lead or Contact entity.

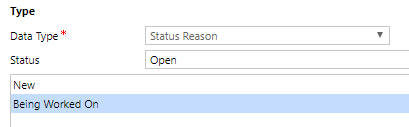
I mean these values, with their label and underlying value:

You can do so, using the Web API .

However, status reason requires a different message to your usual option set.

Here are some examples

1. This example gets the labels and values of options on an option set called mediasource on the lead entity:

Of course for your scenario, you'll need to alter the HTTP request. Replace lead with the name of your entity and mediasource with the name of the option set you're trying to retrieve.

Remember you can test your HTTP request by sending it in your browser as https://yourcrmorganisation.crm11.dynamics.com/api/data/...

This request returns the following response:

2. Now if you want to get the value for statuscode which is also an option set, you have to use StatusAttributeMetadata rather than PicklistAttributeMetadata.

This example gets the labels and values of options on the status reason field on the lead entity:

Which returns the following response:

Again, in your specific HTTP request, replace lead with the name of your entity.

Automate UI testing for Dynamics 365 using EasyRepro and a VSTS Build Agent

Why test my Dynamics 365 UI?

We know how configurable Dynamics 365 is; so much so that no two Dynamics organisations are created equal. Companies work in different ways, leverage varying business processes and come in many shapes and sizes. This is great, because Dynamics is flexible enough to cope, and the developer community loves tackling new projects.

However, these very same companies are always changing, and so too are their Dynamics 365 organisations. This is where the developers come in; they configure each Dynamics organisation to meet their customer's needs, and this process is inevitably ongoing. Reconfiguring and adding to an ever evolving system comes with risk:

  • Do these new configurations meet the customer's specification?
  • Have these changes introduced regression to the existing system?

If your previous Dynamics customisations have tests written for them, these questions can all be answered during development.

As well as mitigating risks, UI tests come with benefits to enhance the usability of the Dynamics 365 organisation being configuring. This means happy stakeholders all around, from developers to end users.

One core benefit is enforcing form style guidelines. Should section headers all be in capital letters? Should the Created On field always be visible at the bottom of every form? Should form headers always contain four fields? Enforce it with UI testing!

What's automated UI testing?

UI tests that aren't automated, consist of a team reading through a list of behavioural expectations and then clicking through the Dynamics organisation manually and asserting a pass or fail to each expectation. These tests can be very click intensive and time-consuming, time that could be better spent by the QA team testing complex features end-to-end.

Automated UI testing is getting a computer to run these tests for you. Selenium is a popular tool built for this purpose: it automates web browsers allowing for websites to be tested by interacting with DOM elements.

Dynamics 365-specific commands have been written for us by Microsoft, in the open source project EasyRepro. In the project's own words:

The purpose of this library is to provide Dynamics customers the ability to facilitate automated UI testing for their projects. These API's provide an easy to use set of commands that make setting up UI testing quick and easy. The functionality provided covers the core CRM commands that end users would perform on a typical workday and working to extend that coverage to more functionality.

Ok, how do I test my Dynamics 365 UI?

Using EasyRepro! See its GitHub page for examples spanning forms, charts, navigation, dashboards and more. I've added an example here below which demonstrates a basic test of navigating through Dynamics and opening a contact form:

Notice how readable the functions of XrmBrowser are such as SwitchView and OpenRecord. This is how good tests should be: human readable and descriptive similar to a design document.

Running UI tests locally takes ages, how do I automate it?

Yes, you'll notice that when your UI tests are run (presumably in Visual Studio), a browser window appears as if by magic and your mouse starts moving to sign into Dynamics, and begin running each test individually. If only these tests could run else where and you could carry on with your work..

Well they can, at least, ever since this commit to GitHub which adds headless compatibility to EasyRepro. Headless Chrome is still just Chrome, but without the UI shell. This is necessary because VSTS Build Agents, which we'll be using to act as a remote machine to run our automated tests, don't have a UI for us to use. Chrome without Chrome!

So with these tools, we can configure a headless Chrome browser to run in a VSTS Build Agent, while we get on with other work.

How do I configure my VSTS Build task?

  1. Ensure your code is checked into VSTS along with your test code project
  2. Restore your NuGet packages and compile your code (as shown in the image below)
  3. Install Chrome silently (without installation prompts) on the build agent

  4. Run your UI tests by referencing their test assemblies

You'll also need to configure your EasyRepro Test Options

Your EasyRepro test methods require an XrmBrowser object, which itself requires a BrowserOptions object.

So, create your TestSettings class and specify Chrome as BrowserOptions.BrowserType:

Then pass your TestSettings.Options to XrmBrowser in your test classes:

And you're done, you're now equipped to automate your UI tests for Dynamics 365 both locally and from a VSTS Build Agent, using Microsoft's EasyRepro and Selenium.

If your current place of work doesn't make use of tests or UI testing, you now also have a basis of discussion to convince others that UI testing is worthwhile! (As if the incidence of regression bugs wasn't enough!)

How to get SLA Business Hours Calendar in C#

When extending Dynamics 365 using plugins and workflows, requirements often involve interacting with SLAs. This could mean retrieving:

  • Daily working hours for example Monday - Friday 09:00 - 17:00
  • Scheduled breaks in the working day such as lunch time
  • Business-wide holidays such as bank holidays

Let's walk through the code in your plugin/custom workflow

First, knowing the ID of the SLA you want to get, retrieve the SLA using service.Retrieve()

A reference to the Business Hours associated with the SLA is stored in the "businesshoursid" field. To retrieve it's ID, use GetAttributeValue()

Now that we have the ID, we can retrieve the Business Hours record itself. Notice that the schema name of the Business Hours entity is calendar:

Calendars (Business Hours) can have multiple rules, depending on how they've been setup in CRM. If your Calendar has been setup to schedule each day the same in CRM, then you'll have fewer calendar rules. However, if each working day is scheduled differently, then you will have many calendar rules.

Retrieve your calendar rules by calling GetAttributeValue() against your Calendar's pattern attribute:

The pattern is returned as a string as shown by the // comment in my code. You can simply split it by comma delimiters after the substring BYDAY= to establish which days the pattern applies to.

Now we're ready to query the inner calendar rules. These give us values duration and offset which allow us to work out how much time in the day is working, and how much is out-of-hours.

We're interested in looking at our innerCalendarRule variable's duration and offset. For example, if the offset is 540, then the rule begins at 09:00am in the morning, because offset is in minutes and 540 / 60 = 9. Therefore if the duration is 480, then the rule ends at 17:00 (5pm) because 480 / 60 = 8 and 9(am) + 8 = 17(:00).

You can now go even deeper to query your inner calendar rule's inner calendar rules. These rules will have a subcode attribute which can be used to determine whether the time outlined by the inner calendar rule relates to working time or out-of-hours time.

That's it

Calendar rule inception can be quite complicated to figure out but it is possible. Hopefully this post has helped get you a step closer to fulfilling your Dynamics 365 requirement.

If you still need to know more, I'd highly suggest you step through your code in a console application or integration test. This will allow you to read and interact with the data returned from your queries in real time. To help with this, remember to use:

Unit test your client-side customisations: xrm-mock v3 released!

Unit testing your client-side customisations for Dynamics 365 just got easier.

xrm-mock is a package that lets you generate a fake implementation of the Xrm object in your client-side code, allowing you to unit test your scripts.

How do I install it?

Simply download xrm-mock's npm package by running

npm install xrm-mock -D

Then import the XrmMockGenerator module and initialise a global Xrm object

import { XrmMockGenerator } from "xrm-mock";
XrmMockGenerator.initialise();

Now you have a global Xrm object, which you can add attributes to, to simulate a real form in Dynamics 365.

Here's how you add basic attributes:

Now for a lookup attribute:

And finally an option set attribute:

See xrm-mock's readme and Wiki for examples of how to unit test against your newly created attributes.

What's changed in v3?

As part of xrm-mock v3 release, attribute create methods only need two arguments: a schema name and a value, as shown in the above code snippet.

Why xrm-mock?

Faking Xrm is hard and time consuming: it has several nested objects which require a detailed understanding to fake correctly. xrm-mock is gaining traction with the open source community, and can expect to see more releases in the coming months. In fact, Daryl LaBar has become a contributor and he's already hit the ground running.

A case for modular JavaScript development in Dynamics 365

JavaScript files become large, very quickly, when it comes to customising Dynamics 365 forms. Code reusability tends to be low across forms, and external libraries often have vast amounts of redundant code.

The module pattern in JavaScript is similar to classes (if you're familiar with C#, Java, Python etc.). Each module is self-contained with distinct functionality, and can be decoupled from other chunks of code with minimal fuss. In Dynamics 365, a module might represent:

  • logic to support toggling sections on a form
  • parts of a framework to support Web API calls
  • reusable security role querying and validation helpers
  • common numeric functions such as VAT calculation

The benefits should be becoming apparent at this point. We've touched on maintainability and reusability, but there's also testability. Each module can have its own individual unit tests, and each form (i.e. contact, account) can be tested end to end. See my GitHub page for an example.

How do I write modular JavaScript for Dynamics?

In this example, I'll demonstrate a requirement that locks every field on the contact form when it is loaded, if the user does not have a specific security role.

We need three modules: contact, security and fields. Security needs to get the users roles and determine if a given security role exists within the users roles:

Note: certain syntax will be unfamiliar here, if you're new to modules. The contents of the functions should feel familiar though.

Fields needs to be able to lock all fields on a form:

Notice the line module.exports = new(); This exposes the module to other modules, which can make use of it by using the require syntax, as shown in the final form contact:

And you're done! The contact form pulls in functions from other reusable files and makes use of them to complete some business logic end-to-end inside of its onLoad function.

But wait... the file path "../security.js" might mean something to your code editor, but it means nothing inside a browser. Chrome or IE therefore won't be able to load the files required by the contact form.

You're going to need a bundler

Bundlers recursively check your application's dependencies and package the modules needed into one (or more) browser-safe bundle.

In this example, I use my preferred bundler, Webpack.

Start by ensuring you have Node.js installed. Then, open a command window in your script's project directory e.g. C:\source\repos\crm-project\web-resources.

To install the latest release of Webpack locally, run: npm install --save-dev webpack

You're now going to need a script to build your contact module. Open your package.json file (which should exist having installed Webpack). Add the following script:

Replace ./src/contact/.. with the relative path of your contact.js file.

Running this script packages your contact script and all of its dependencies and outputs them to the file ./dist/contact.bundle.min.js. The additional tag of --optimize-minimize minimises your script, so that it's smaller in size and production-ready. The script can be run from your command line using npm run build-contact

Now you're (really) done!
Some notes and caveats:
  • Using JavaScript to lock fields often isn't the best approach because it's client-side and can therefore be overriden.
  • Minimised scripts aren't readable or easily debugged. You may wish to exclude --optimize-minimize if you're deploying to a development or sandbox environment.
  • I've chosen one of several ways to implement JavaScript modules. There are pros and cons to each. For detail see here.

How to display record counts on a stacked bar chart in CRM

TL;DR export the chart, find the line of xml which reads as follows, and add IsValueShownAsLabel="True"

If you'd like a step-by-step, read on!

Why use a stacked bar chart?

Stacked bar charts are useful for grouping data that are easily categorised. Take for example the statuses of Leads and Opportunities: Qualified, Disqualified, Open, Won and Lost. Each entity only has a few statuses, which makes for a clean chart.

The following example displays opportunities created per day, grouped by their status:

The view itself is visually very informative, with each opportunity category displayed as a different colour. Clicking each individual bar drills down to display records of the chosen status in a separate view.

One enhancement, however, which is not customisable through the chart editor, could be the addition of a record count for each bars groups. In that way we'd be able to see how many open, won and lost opportunities we have per day at a glance without having to select each column.

To achieve this, we'll need to export the chart, edit its underlying xml code, and reimport the chart.

Step-by-step:

  • Step 1: Export the chart
  • Step 2: Edit the xml
  • Open the xml file with a text editor such as Notepad, Notepad++ or Visual Studio Code. Locate the line which begins Series ChartType= .. then add IsValueShownAsLabel="True"

  • Step 3: Import the chart

That's it! Observe that the complete version displays a number on each bars groups, showing how many records are won, lost and open:

How to Pass your Microsoft Exams

Watching videos on PartnerSource and reading notes are great ways to learn the material you need to pass your exams. But it can be boring. For certain exams there are days of videos to watch, rather than hours (see MB2-718).

I recently passed 3 exams on Microsoft Dynamics 365. I learnt a lot about the software, and I learnt a lot about how to revise. Here's how I did it.

Step by step

Step 1 read through the skills measured section of the exam page. This bullet points exactly what you need to know.

Step 2 find your sources. These should be videos from PartnerSource and blog posts. Neil Parkhurst's blog is a fantastic example of someone who's documented their learning for your benefit.

Step 3 take notes. This stops your mind from wandering and keeps you engaged with the material you're watching and reading.

Step 4 create your own practice exam.

If you turn your notes into multiple choice questions, they can be fed into an exam simulator. This has the benefits of:
  • being in the same format as the exam itself
  • allowing you to learn visually
  • being interactive and responsive

I've written a very basic exam console which you can download from GitHub. Here it is in action:

It works by feeding in a .json file, which you can simply create from your notes. The file should be formatted as follows:

As an alternative, you may consider Florian Krönert's certification trainer: a well-documented, graphically stunning certification trainer. It too reads in a .json file and provides you with a multiple choice interface and feedback on your answers.

Best of luck with your exams

Unit test your client-side customisations even faster

Last month I released this post detailing how you can unit test your JavaScript customisations for Dynamics 365.

In summary, xrm-mock is an npm package which you can install to mock the Xrm object in your client-side code. By mocking Xrm, you can write tests to assert the state of your CRM forms after JavaScript functions are called, such as onLoad() and onChange() for a field.

xrm-mock has been used across several projects both by myself and others, and has subsequently received some useful feedback. Namely:

"mocking Xrm is hard"

...and not to mention time consuming.

Enter: xrm-mock-generator. This project drastically reduces the time it takes to mock your CRM form's Xrm object. A usage guide is available on the project's GitHub page (link here), but here it is again:

  • Step 1: install via npm install xrm-mock-generator
  • Step 2: import var XrmMockGenerator = require("xrm-mock-generator");
  • Step 3: initialise a global Xrm object var Xrm = XrmMockGenerator.initialise();
You now have a global Xrm object, as if you had loaded a form in CRM.

Here's an example:

This example showcases a contact form that changes the contact's firstname from Joe to Bob when the form is loaded.

src/contact.js

test/contact.test.js

You'll notice the line: XrmMockGenerator.createString("firstname", "Joe"); - that's how you add an attribute to Xrm. You can also add date attributes, option sets etc. which is all detailed on the GitHub usage guide.

The next primary goal of the project is to automate attribute metadata. That is: connect to a CRM organisation and automatically download the metadata for a form. If you feel like you can contribute or offer a suggestion, please message me on GitHub.

Unit test your client-side customisations

If you regularly write client-side customisations for Dynamics 365 forms, you should strongly consider writing tests for them.

To do so, you will require a mock implementation of Dynamics' Xrm namespace object: the object you use to manipulate the form with functions such as getAttribute and setRequired. This is because though your code knows about the Xrm object when it's running on a Dynamics form in the browser, your tests won't know about it when running locally on your machine.

Mock the Xrm object

I've begun creating a mock implementation of Xrm here on my GitHub page. It's usage is straightforward, and you can follow my examples if you're using TypeScript to write your client-side customisations.

First, clone the repository using npm install xrm-mock.

Then, create a file for your entity's form. Here's an example for the contact entity:

Note: To use this script on a Dynamics form, just add Company.Contact.MainForm.onLoad as one of the form's onLoad() event handlers.

Then, create a second file to test your contact script. The below example is using jasmine.

Now run your tests

You'll now need to configure a test runner. If you've followed my example, you can install jasmine by running the following command in your terminal: npm install jasmine --save-dev. This assumes you have node installed on your machine.

Combined with jasmine, I use wallaby.js to visualise my tests as I'm writing my code. Here it is in action:

Validate Multiple Fields in JavaScript

CRM forms can often have multiple fields marked as business required. Mandatory validation is sometimes even added dynamically via JavaScript, for example based off the value of an option set. If you have a large CRM form, it's not always possible to see all of the red (*) asterisks; users will have to try and save the form over and over to be prompted and receive focus of each missing field individually.

You can instead program all of your business required fields into an array in JavaScript, and present all of the missing information in one popup box. This is more user-friendly.

First, setup your array of fields as objects where each object holds the schema name, label and value of the field:

Then iterate through all of your fields to determine which, if any, don't contain a value (which they should because they're business required):

Note: I've chosen to use Array.prototype.forEach() in this example because it's supported in IE9 and above. If your CRM user base is using a more modern browser, consider using let:

More information on array iteration and JavaScript browser compatibility here.

Anyway, we finally need to format the labels of our fields which are missing information into a readable message to be presented as an alert. The following code splits the array of field labels each with a comma, except the last element where an 'and' is placed:

You can then present your alert with alert(message);:

As an alternate message formatting, you could use the • unicode character and the \n escape character to mock bulletpoints. Unfortunately, html tags can't be passed to alert boxes, otherwise we'd use ul:

Note: the example above only uses three fields. The solution presented should probably only be used for a requirement involving 10+ fields. Adding JavaScript adds complexity to the system and makes it harder to maintain and should therefore be avoided where possible.

Post Data from a Dynamics CRM Form to an iFrame

HTML web resources can be embedded into a CRM form within an iFrame. Often you'll need to send data to and from the embedded HTML page. Here's how.

If you need to send data from an HTML page to a CRM form, you can use window.parent to access the Xrm namespace. For example, a user may enter a value into an input field on your embedded HTML page which could then update a value on a CRM form automatically by using:

Sending data the other way (from a CRM form to an HTML resource) is slightly more complicated.

Firstly, when customising your form and adding the embedded HTML resource, ensure that cross-frame scripting is not disabled (which it is by default). If this option is left checked you'll receive a sandboxed script cross-origin error message in the browser console, and the script won't load on the form.

Secondly, set up the data you want to send from your CRM form in JavaScript. This example sends a contact's first and last name in their respective onChange() events:

More on window.postMessage() can be found on MDN here.

Finally, configure your HTML page to accept and process messages from your CRM form. Place the following script tag in your HTML's body:

Here's the finished example:

Retrieve Money Value from an an Aliased Value in a LinkEntity with C#

When you query an entity you can link another entity to it. You might want to do this to:
  • add additional conditions to your query with pertain to a related entity
  • return columns from two entities within only one query (which is more efficient)

Here's a scenario:

You have a Product lookup on the Lead entity titled 'Product of Interest' and the Product entity has an option set called 'Product Type'. A query could therefore be to retrieve all Leads that have a Product of Interest where the Product has a 'Product Type' of 'Equipment'.

In C#, your QueryExpression would utilise a LinkEntity and read as follows:

The query above retrieves all active Leads in CRM and links their Product of Interest, returning no columns from the Lead and the 'Price' column from the Product.

When retrieving the linked Product's 'Price' from a returned Lead, you might expect to be able to use GetAttributeValue, but unfortunately you can't. You must first use GetAttributeValue, then cast the object's Value property to Money, and then retrieve the Money's Value property... phew.

Here's the final code to retrieve a linked entity's Money value:

Note that the attribute you're retrieving from the Lead is "Product.price" not just "price". This is because LinkEntity attributes are prefixed with the EntityAlias property of the LinkEntity object passed to the QueryExpression (see the first code block above).

Backpopulate an AutoNumber Field

If you've just implemented an autonumbering solution in CRM, newly created records will have an autonumber generated for them. Now, however, it's likely you'll need to backpopulate all records that were created before the autonumbering solution was implemented.

As an example, the SQL script below selects all Contacts in CRM and iterates through them, setting their [AutoNumber] field equal to the Contact's database row number. The script also pads this number, to keep in alignment with my autonumber syntax, which is padded to be a minimum of 10 characters long. For example, a row number of 489 is padded to an autonumber of 0000000489

When using this script, replace:

  • [AutoNumber] with the schema name of your autonumber field e.g. new_autonumber
  • [Database] with the name of your CRM database
  • [ContactBase] with the table of the entity you're looking to update. You'll also need to replace ContactId with the primary id of this entity


I recommend this autonumber from Celodon, the code for which is hosted here on GitHub.

Calculate Working Time between Two Dates in C# (including SLA Working Hours)

Often we need to calculate the time between two dates, but only take into account working hours. Working hours usually fall somewhere between 09:00 - 17:00, Monday - Friday, and are defined in CRM via Entitlements and SLAs. There's no way to achieve this out of the box, therefore custom code must be written for this calculation within a plugin or a workflow.

The code I provide in this article is one of many ways this can be achieved. My approach here is to abstract days, minutes and time duration programatically and to then provide a static Calendar class to deal with CRM-specific logic.

Minute's are straightforward. You'll see here I simply conceptualise them as an object that has an Index property to represent which minute of the day the minute is. For example a minute with Index is 00:10.

One level higher, I outline a day, which has a list of minutes (there are 1440 minutes in a day):

Then we have a duration, which is a collection of days between a start and an end:

Finally we have a static calendar class which handles CRM-specific entitlement and SLA logic. This currently only works for retrieving an Entitlement from a Case. Attribute strings can be changed according to your requirement/the entity you're working with.

How is this used?

Firstly, the 4 classes from above are copied into a project.

Next, in the plugin's execute method, two DateTimes are retrieved, along with the context entity. In this example I'm using a Case entity and my Calendar class:

We now have a list of days representing a model of working hours defined in the Case's Entitlement stored in the workingHours variable.

We can now create a duration object, which models the time between our two DateTimes:

Then we remove time which we're not interested in (it falls outside of valid working hours):

And finally call GetTotalMinutes() and calculate the time in minutes between our two DateTimes without the invalid time:

And that's all. We now have the valid working time (in minutes) between the two DateTimes stored in the responseTime variable.

Retrieve Option Set Metadata Via SQL

When working on projects, typically those that involve integration, several stakeholders may need to know the underlying integer values of option sets. Said stakeholders may be third parties or internal developers, who don't necessarily have access to view option set metadata in CRM. The task of providing this metadata can therefore fall to you, the CRM consultant, which can prove to be time consuming and a project bottleneck.

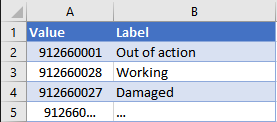
You'll move to your CRM solution, find the attribute and create an excel table for the requested option set to e-mail back to the stakeholder:

Speed things up

If you or better yet, the other stakeholder has SQL access, run the following script to generate a table of option set values and labels for a given option set:

The above code snippet retrieves metadata for the statuscode option set on the Account entity.

In the WHERE clause:

  • statuscode can be replaced with the schema name of any option set
  • Account can be replaced with the schema name of any entity

Note that the e.Name condition is not necessary if you are sure the option set attribute only exists on one entity. In this example however, we need to specify the entity because we know that statuscode exists on every entity in CRM.

C# Attribute Checking is Inefficient

If an entity does not contain an attribute but we try to retrieve the attribute's value anyway, a NullReferenceException is thrown. Therefore, basic practice is to check that an entity contains an attribute before trying to retrieve the attribute's value. The following code snippet gets an account entity from a plugin's context then retrieves value for attribute address1_line1.

This is inefficient because .Contains() uses the same check as GetAttributeValue(), which internally refers to the actual entry location. The lookup functionality (finding the value of a key in a collection) is duplicated.

Use TryGetValue() instead

Last week I posted a set of useful extension methods to shorten our C# code, making it more readable and in some cases more efficient. Add a new extension method:

This method tries to get an attribute's value and returns true if the attribute exists. Crucially, it also returns the value of the attribute if it exists, as an out parameter.

We can now rewrite our code to get the value for address 1 line 1 and only iterate through the attribute collection once:


It's important to remember that this is a micro-optimisation. We should still consider whether slightly more optimised code is actually worth it i.e. does it sacrifice code readability?

This post was inspired by a recent pull request from the .NET Roslyn compiler which is open-source and hosted here on GitHub.

Finally, for the curious, the performance difference between TryGetValue and Contains is discussed further here on StackOverflow.

Qualify a Lead in C#

Typically, when we want to deactivate a record in a plugin or a workflow, we turn to SetStateRequest. Qualifying a Lead isn't quite as straightforward. If you've qualified a Lead through the CRM interface, you'll know that:
  • An Opportunity is created from the originating Lead.
  • You can select whether to create a Contact or Account from the originating Lead.
QualifyLeadRequest in the Microsoft.Crm.Sdk.Messages namespace provides us with a class which allows us to specify all of these options and more programatically.

The code snippet below creates a new QualifyLeadRequest, populating all of it's required properties.

Replace all of my empty new EntityReference() objects with valid EntityReferences (which are instantiated by passing an entity name and an ID). Refer to the Microsoft documentation for information on other optional parameters which you can use.

The request is executed and its response stored in the qualifyLeadResponse:

The most interesting property of the response object is CreatedEntities. See the Microsoft documentation for information on other properties stored in the QualifyLeadResponse.

CreatedEntities contains a collection of EntityReferences, one for each entity created when qualifying the Lead. To get the Contact that was created, for example, iterate through the collection and query the LogicalName of each EntityReference:

Retrieve Option Set Metadata in C#

Given the name of an entity and the name of an option set field, Microsoft.Xrm.Sdk.Messages can retrieve all the labels and corresponding integer values for an option set.

Simply build a new RetrieveAttributeRequest and iterate over the response like so:

optionList now contains a list of all option set options where each object in the list has a Value property and a Text property.

To retrieve a given option set value for a label, use a Linq query: